A Socket Secure Version 5 proxy, or a SOCKS5 proxy for short, is a type of proxy server that’s based on the SOCKS5 protocol. It’s one of the newest protocols available in the market and a better version of the HTTP and HTTPS protocols. A SOCKS5 proxy is lightweight and built to be an all-purpose proxy solution. You can utilize a SOCKS5 proxy when doing any task, and it can also work on any kind of network protocol on any port.
Advantages of SOCKS5 Proxies
As the newest version of the SOCKS protocol, SOCKS5 proxies bring in a lot of advantages. Here are four of the most significant benefits of a SOCKS5 proxy:
Fast Connection.
Other types of proxies usually change a part of the data packet header of a request, but a SOCKS5 proxy doesn’t rewrite anything on the header. This makes their packets smaller in size, and thus easier to process and faster to send.
High Success Rate.
As a SOCKS5 proxy doesn’t need to rewrite anything on the header, the chances of an error happening while employing changes to the header are massively reduced.
High Security.
A SOCKS5 proxy can give you a lot of security since you can set it up similarly to a VPN. You can do this by implementing a dedicated SOCKS5 proxy with an SSH-encrypted tunnel. Doing this will heavily tighten up your SOCKS5 proxy security.
Selective Traffic Routing.
You can effectively configure web applications to route all of their traffic through a SOCKS5 proxy. This helps if you want to separate an application's web traffic.
SOCKS5 Proxy Use Cases
SOCKS5 proxies have a lot of uses for different people or businesses. For example, if you’re an individual that wants to transfer data in real-time for streaming websites or optimizing gameplay, then a SOCKS5 proxy is great for you. The same is also true for businesses that want a fully comprehensive proxy solution that can help bypass filters or firewalls. Other use cases for SOCKS5 proxy are:
- Bypassing network restrictions.
- Unblocking geo-restricted content.
- Circumventing bans.
- Accessing local networks remotely.
- And any advanced tasks like web scraping or SEO campaigns.
SOCKS5 Proxy VS HTTP Proxy
There are a lot of differences between a SOCKS5 proxy and an HTTP proxy to the point that you could say both are completely different. Here are some examples:
Ability to handle traffic.
An HTTP proxy is built only to handle HTTP or HTTPS traffic while a SOCKS5 proxy can handle any type of traffic or protocol.
Header modification.
A SOCKS5 proxy will not modify the data packet header while an HTTP proxy will change the header.
Authentication.
HTTP proxies will not offer you any type of authentication while a SOCKS5 proxy does.
Level.
A SOCKS5 proxy is considered to be low-level since it can handle any type of traffic or protocol while an HTTP proxy, which is considered high-level, can only handle a certain type of traffic and protocol.
OSI Layer.
A SOCKS5 proxy is at the 5th layer, the Session Layer, while an HTTP proxy is at the 7th layer, the Application Layer.
Port Usage.
An HTTP proxy will only work at ports 80 and 443 while a SOCKS5 proxy will work on any port.
Connecting With a SOCKS5 Proxy
We’re going to show you how to connect to applications with a SOCKS5 proxy. For example purposes, we’ll be utilizing the uTorrent application as it’s the type of application that would be a great use for the SOCKS5 proxy.
Step 1. Open uTorrent and click on “Settings”.
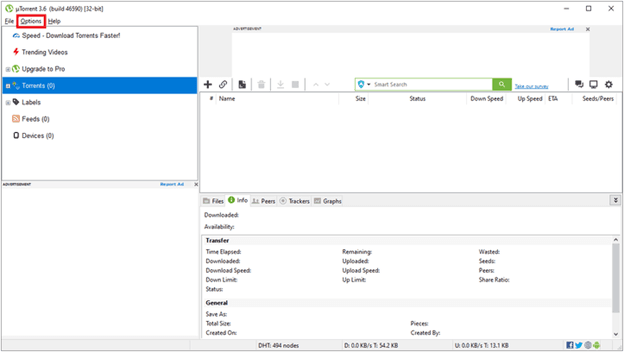
Step 2. Click on “Preferences”.

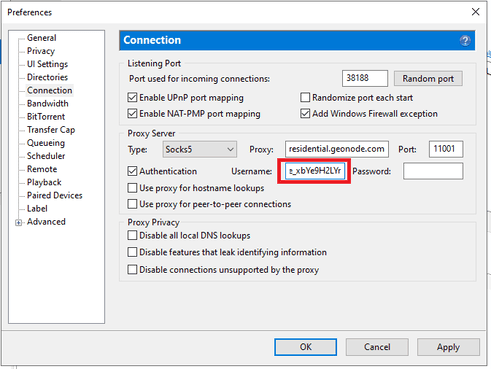
Step 3. A new window will then pop up. Click on “Connection”.

Now, you need to go to your proxy provider and acquire the proxy server details. For example purposes, we’ll be using Geonode. If you want to get it from Geonode, you can jump to “Acquiring Proxy Server Details With Geonode”.
Step 4. Click on “Proxy Type”.

Step 5. Select “SOCKS5”.

Step 6. Enter your proxy’s “Hostname” or “IP address”. This is the first part before the semicolon, which in our example is “premium-residential.geonode.com”.

Step 7. Enter your proxy’s “Port Number”. This is the second part before the semicolon, which in our example is “11001”.

Step 8. Click on “Authentication”.

Step 9. Input your Geonode username, which in our example would be “geonode_xbYe9H2LYr”.
Step 10. Input your Geonode password, which in our example would be “9806022c-cd4a-4776-a053-73fee44344dd”.
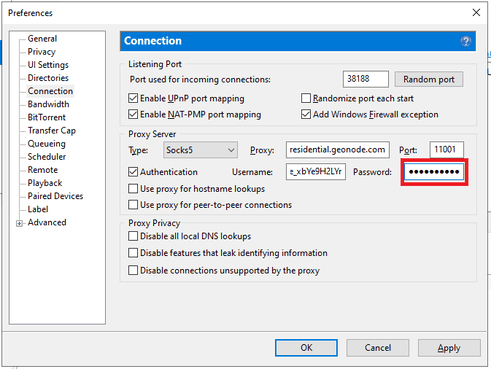
Step 11. Click on “Apply”.

Step 12. Click on “OK” to save.
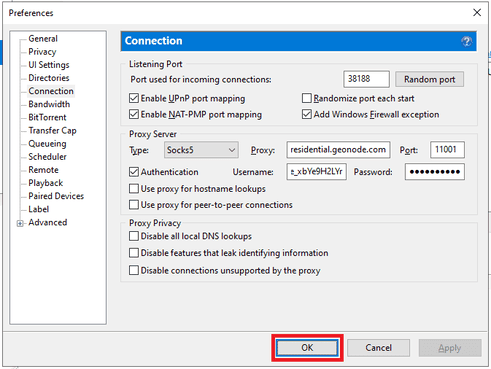
Congratulations! Now, every time you download a torrent through uTorrent, it would have to go through the SOCKS5 proxy.
Acquiring Proxy Server Details With Geonode
Step 1. Go to Geonode, log in with your existing account, or sign up to create a new one.

Step 2. On the Home Page, click on “Residential Services”.

Step 3. Scroll down until you see “Endpoints”.

Step 4. Choose the “SOCKS5 Protocol”.

Step 5. Select which Session Type you want to utilize: “Rotating Proxy” or Sticky Proxy.
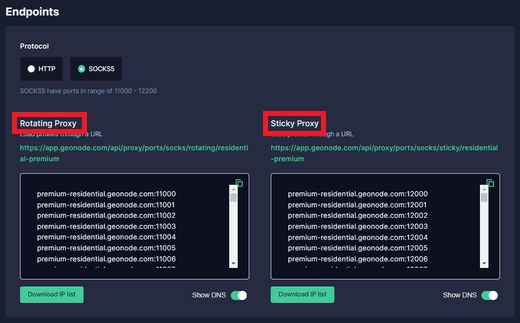
Step 6. Choose which proxy you want to utilize. For example purposes, we’ll be using the highlighted proxy “premium-residential.geonode.com:11001”.

If you want to use an IP address instead of a DNS, simply turn off the Show DNS button, and IP addresses will show up.
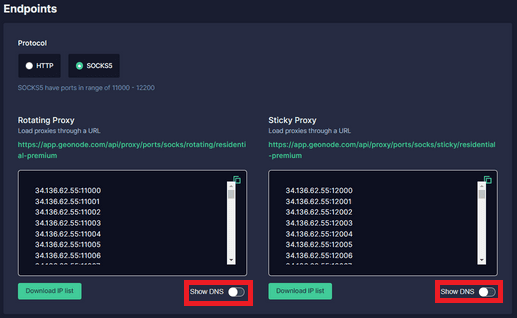
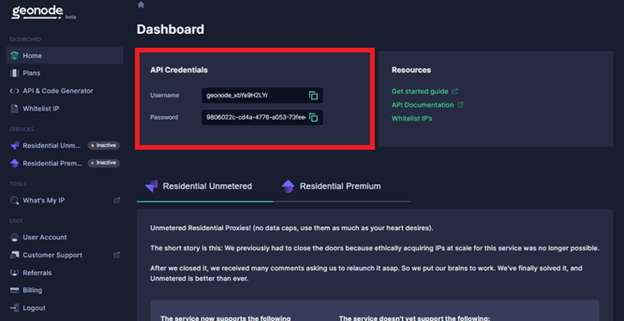
Step 7. Now you need your proxy account’s “Authentication Details”. For Geonode, this is on your account’s home page.
