The Apple Store is Apple’s official website for all of its products and it is one of the best places where customers can purchase those products. The Apple Store is also heavily personalized based on the individual, the Apple products they already own, and even where they're from. As it’s Apple’s official store, you won’t get tricked into buying something that has incorrect information about it.
As previously said, the Apple Store’s heavy personalization also includes where the user is from. Users from different countries would have a distinct type of content that is displayed to them. Items that are available in one country may not be available in another country. The only exception to this is for users in the United States as all Apple products are available in the US and even new Apple devices are released there first.
The best way to bypass these limitations and gain access to all Apple products is to change your IP address to a US IP through the use of an Apple Store proxy. An Apple Store proxy will act as an intermediary between your device and the internet. All of your requests will be done via the proxy server so any website you visit will only be able to see the IP address of the proxy server you’re using. Your own IP address will be hidden making it pretty simple to deceive websites into thinking you actually have a US IP.
For the best Apple Store proxies to use, residential proxies are the most reliable types to utilize as these types of proxies use real residential IPs from actual devices making it near impossible for websites to recognize the fact that you’re using a proxy. To websites, you would seem like a genuine user from the US.
Let’s set up an Apple Store proxy server.
For Mac.
To start configuring your proxy settings in MacOS, simply:
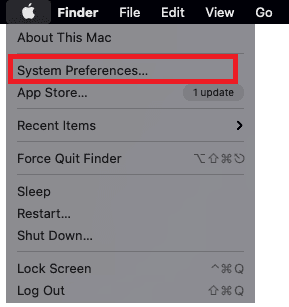
Step 1. Click on the Apple Icon.

Step 2. On the drop down menu, click on “System Preferences”.
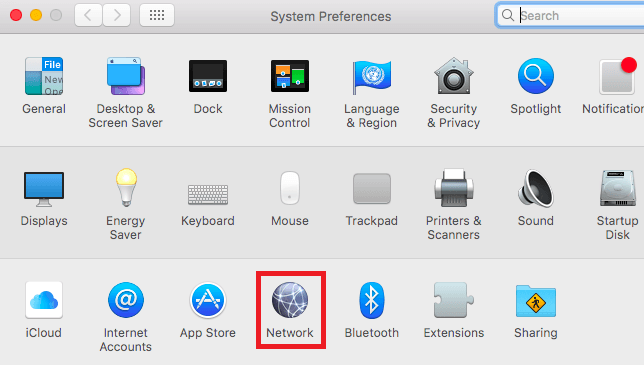
Step 3. Click on “Network”
Step 4. Click on “Advanced”
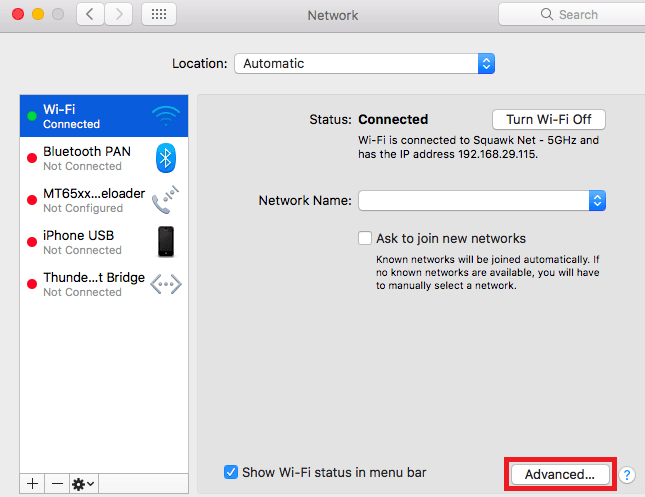
Note: Make sure to connect to your wi-fi first.
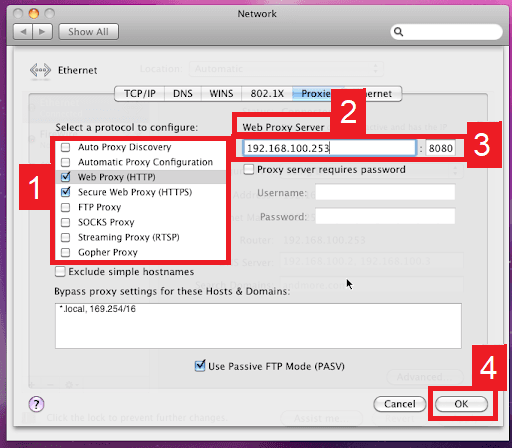
Step 5. Click on “Proxies”

This should then redirect you to MacOS proxy settings. MacOS is more straightforward compared to windows. You only have one option which is to manually configure your proxy server.
Here are the steps to follow:
- Select which proxy IP protocol you want to configure. This depends on which protocols your proxy service provider offers.
- Turn on Secure Web Proxy
- Input the Proxy Server Address and Port Number
- Click OK to save the configurations
Note: You may be prompted for your Mac user password to save your settings.
Setting Up Proxy Settings in IOS Devices
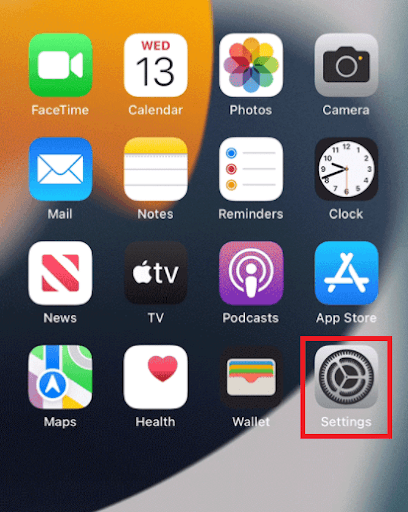
Step 1. Go to your Iphone’s Settings app.
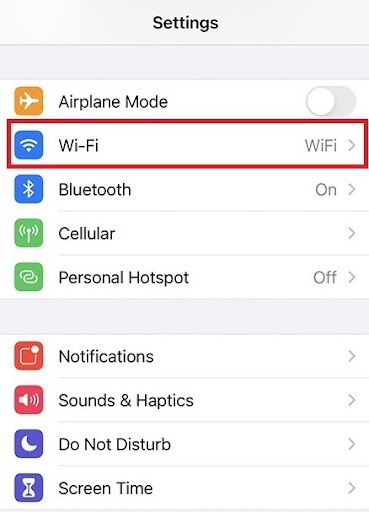
Step 2. Click on “Wifi”
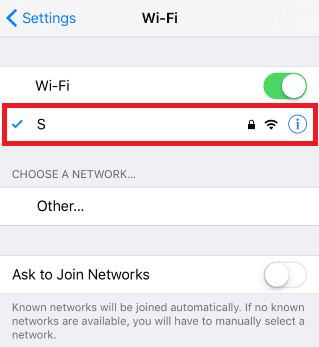
Step 3. Connect to the wi-fi network you want to use a proxy with and then tap on it again.
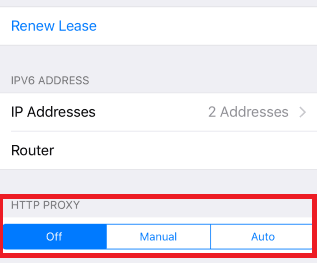
Step 4. Scroll down to the bottom and you will see the “HTTP Proxy” option
Configuring Your iPhone’s Proxy Settings
After being redirected to your iPhone’s proxy settings, you are then given two options to choose from: Manual proxy setup or automatic proxy setup. If you want automatic proxy detection for your proxy settings, choose the “Auto” option. Choose the “Manual” option if you want to utilize a specific ip address and port number.
If you choose the “Auto” option, your iPhone will then immediately check if a proxy is needed for your current network before automatically configuring your proxy settings. Your iPhone will not use a proxy server if it deems it to be unnecessary, but if you really want to use one then simply obtain an automatic proxy configuration script, or a .PAC file for short, and enter it in the url section as seen below.
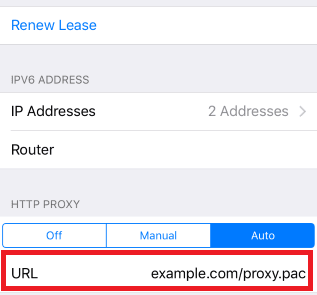
Note: You can get a .PAC file from your proxy service provider or your network administrator.
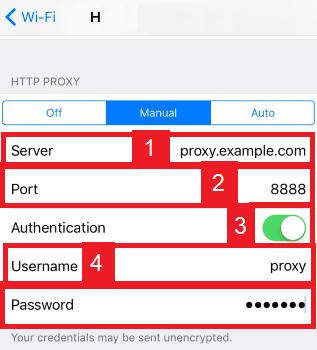
If you chose the “Manual” option then:
- Enter the server address or a IP address
- Enter the port number
- If your proxy provider says that authentication is required for the proxy server, then turn this on.
- Enter your authentication details
Congratulations! You have now finished configuring an Apple Store proxy server.


