Microsoft Edge, the successor to the iconic Internet Explorer, delivers a faster, more modern browsing experience optimized for today's users. Compatible with multiple devices, including Linux OS, Edge boasts many features such as built-in Internet Explorer mode for compatibility with legacy websites and enhanced organization capabilities for visited web pages.
A standout feature of Microsoft Edge is its robust privacy and security protection. With top-rated defense against phishing and malware attacks on Windows 10, a built-in password manager, and numerous free VPN extensions, Edge helps safeguard your online activities. Moreover, the browser offers a kid-friendly browsing mode to protect young users. Alongside these security features, utilizing web scraping tools can enhance your browsing experience by providing valuable insights and data from various websites, all while maintaining your online privacy.
Another great way you can add to this protection and enjoy a more sophisticated experience is to install a proxy server on your device! By using a free proxy list, you can find numerous proxy servers to choose from, ensuring you have a secure and private browsing experience. Proxies help in masking your IP address, providing anonymity and bypassing geographical restrictions on certain websites. With a reliable proxy server, you can further enhance your online privacy and security while using Microsoft Edge.
Installing a proxy server on Microsoft Edge is a breeze, as it automatically adopts your system's proxy settings, similar to Google Chrome. This means there's no need for additional configuration, making Edge an ideal browser for using proxies.
How To Set Up a Proxy On Microsoft Edge
This is a comprehensive guide to show you how to install a proxy server in Microsoft Edge.
Here are the things you need to do:
- Go to Microsoft Edge proxy settings
- Choose an option you want to go with: automatic proxy setup or manual proxy setup
- Input the necessary information for either option
- Click “OK” to save!
Setting Up Microsoft Edge’s Proxy Settings
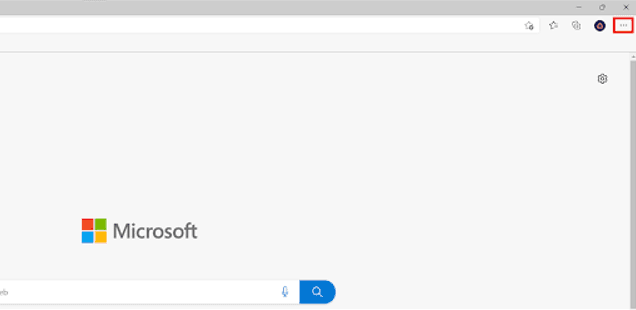
Step 1. Open the Microsoft Edge Browser and click on the horizontally aligned buttons at the top-right corner.
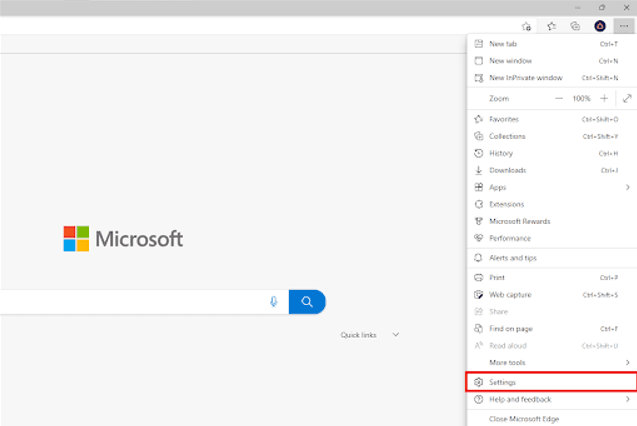
Step 2. On the Edge menu, select Settings.
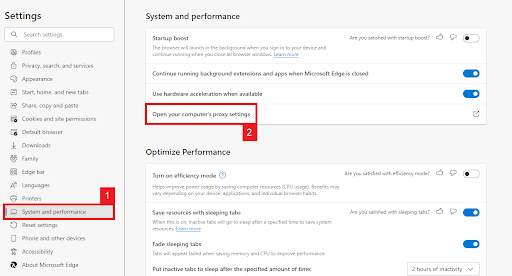
Step 3. Click on **System and Performance **and then select Open your computer’s proxy settings.
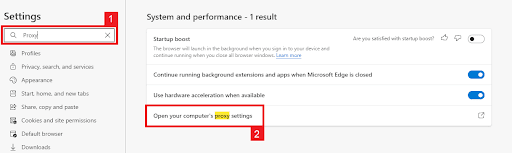
Alternatively, you can search for “Proxy” in the search bar located at the top left and then click on Open your computer’s proxy settings.
Now, you should be redirected to your system’s proxy settings. Below is a more detailed description of how to configure your system’s proxy settings.
Configuring Your System’s Proxy Settings
For Windows
You are now given two options: automatically configure your proxy settings or manually input them yourself. If you want automatic detection, choose the first option Automatic Proxy Setup and if you want to utilize a specific IP address and port number then choose the second option Manual Proxy Setup.
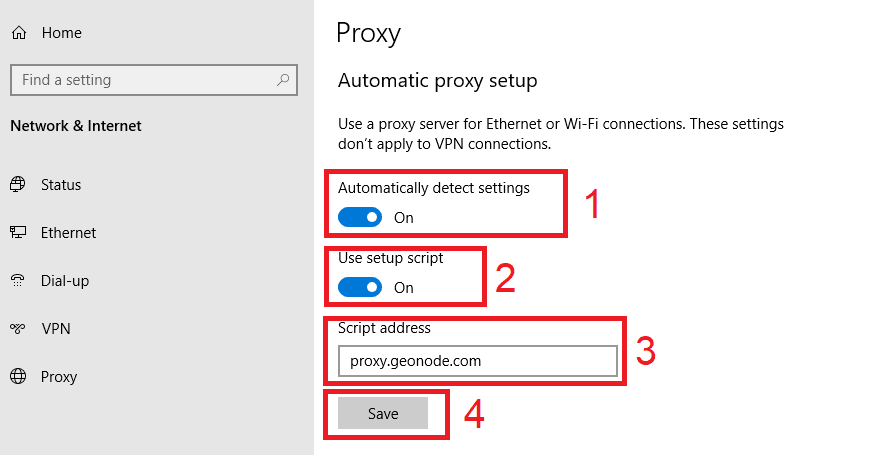
If you chose Automatic Proxy Setup, then:
- Turn on Automatically detect Settings
- Turn on Use setup script
- Enter the script address
- Click Save
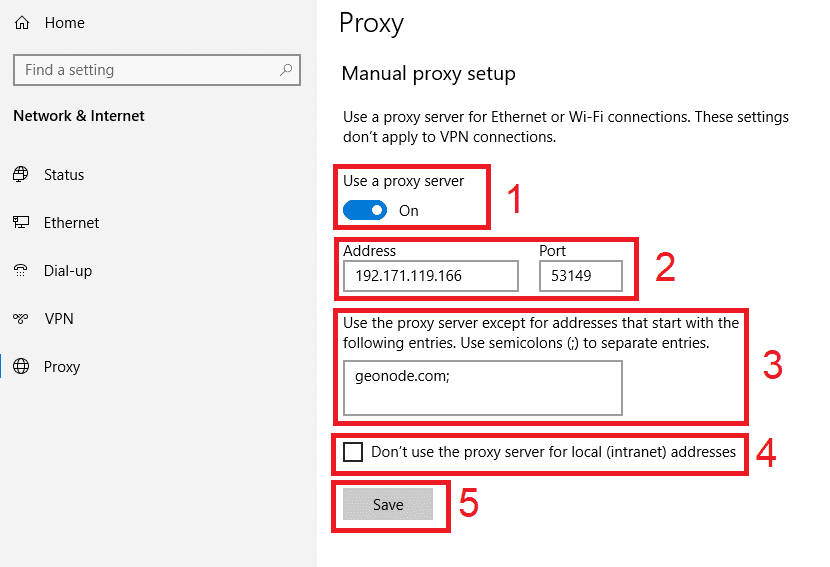
If you chose Manual Proxy Setup, then:
- Turn on Use a proxy server
- Input both server address and port number
- If you have any addresses you would like to visit without a proxy, enter them here
- Turn on Don’t use the proxy server for local addresses check box if you want to access a local server without a proxy
- Click Save
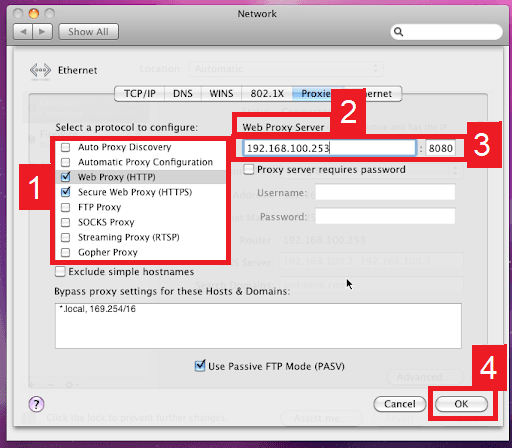
For MacOS
You only have one option in MacOS which is to manually configure your proxy server but you will be given a variety of proxy options to choose from like a HTTP proxy or a SOCKS proxy.
Here are the steps to follow:
- Select which proxy IP protocol you want to configure. This depends on which protocols your proxy service provider offers.
- Turn on Secure Web Proxy
- Input the Proxy Server Address and Port Number
- Click OK to save the configurations
Note: You may be prompted for your Mac user password to save your settings.
Congratulations! You have now finished your configuration for a Microsoft Edge proxy server! Do note that the first time you visit a website after setting it up, a prompt will pop-up asking for your login credentials from your proxy account.
Configuring Your Mobile Device's Proxy Settings
To setup a proxy server for your phone's Microsoft Edge, simple configure it's proxy settings. A mobile device would automatically apply it's proxy server to all web browsers you will use. This is applicable for both an Android and an iPhone. Here's a thorough guide for Android and another one for iPhone.
How to Add Exceptions to Your Proxy in Microsoft Edge
To add exceptions to your proxy in Microsoft Edge, specify a list of websites or IP addresses you want to bypass the proxy server. This can be useful when accessing certain websites without using the proxy server. Follow these steps to add exceptions in Microsoft Edge:
- Open Microsoft Edge and click on the three horizontally aligned dots in the top-right corner of the browser window.
- From the Edge menu, select 'Settings.'
- Click on 'System and Performance' and then select 'Open your computer's proxy settings.'
- You will be redirected to your system's proxy settings. Under the 'Manual Proxy Setup' section, locate the 'Use a proxy server' option and ensure it is enabled.
- In the 'Exceptions' or 'Bypass proxy server for these addresses' field (depending on your system), enter the websites or IP addresses you want to bypass the proxy server, separating each entry with a semicolon (;). For example, if you want to bypass the proxy server for "example.com" and "example.org," enter "example.com; example.org" in the field.
- Click 'Save' or 'OK' to save your proxy exception settings.
When you visit the websites or IP addresses specified in the exceptions list, your traffic will bypass the proxy server and access the sites directly. Remember that adding too many exceptions may reduce the effectiveness of your proxy server in protecting your privacy and security.
Proxy or VPN for Microsoft Edge: Which One Should You Choose?
When protecting your online privacy and security in Microsoft Edge, you have two main options: a proxy server or a Virtual Private Network (VPN). Both options offer benefits and drawbacks, so it's essential to understand the differences between them to make an informed decision.
Proxy Servers
A proxy server acts as an intermediary between your device and the internet. When you use a proxy, your web traffic is routed through the proxy server, which hides your IP address and allows you to bypass geographical restrictions on certain websites. Some benefits of using a proxy server include the following:
- • Faster browsing speeds compared to VPNs, as proxies generally have less encryption overhead.
- • The ability to bypass geo-restrictions and access region-specific content.
- • Anonymity by masking your IP address.
However, proxy servers also have some disadvantages:
- • Limited security compared to VPNs, as most proxy servers do not encrypt your data.
- • Websites that detect and restrict proxy usage can easily block proxy servers.
- • Some free proxy servers may log your browsing activity, compromising your privacy.
Virtual Private Networks (VPNs)
A VPN creates an encrypted connection (tunnel) between your device and a VPN server, which then connects to the internet. This tunnel encrypts all data passing through it, ensuring your online activities remain private and secure. Some benefits of using a VPN include the following:
- • Stronger security through end-to-end encryption, protecting your data from interception and monitoring.
- • The ability to bypass geo-restrictions and access blocked content.
- • Enhanced privacy by hiding your IP address and keeping your browsing activity private.
However, VPNs also have some disadvantages:
- • Slower browsing speeds due to the additional encryption overhead.
- • Some VPN services may log your browsing activity, compromising your privacy.
- • VPN services often require a subscription fee, while some proxy servers are available for free.
Command-Line Options for Microsoft Edge Proxy Settings
Although Microsoft Edge doesn't offer built-in command-line options for directly adjusting proxy settings, you can use command-line tools for your operating system to modify system-wide proxy configurations. Since Edge follows the system's proxy settings, these changes will also apply to the browser.
For Windows:
You can use the Netsh command to manage proxy settings in Windows. Run Command Prompt or PowerShell as an administrator and follow these steps.
- Enable the proxy server (replace <IP_address> and <port> with your proxy server's details).
- Disable the proxy server.
- View the current proxy setting.
Note that these commands impact system-wide proxy settings, which may affect other applications that use the system proxy.
For macOS:
On macOS, use the network setup command to configure proxy settings. Open Terminal and follow these steps:
Determine your active network service name:
- Enable the proxy server for HTTP and HTTPS (replace <service_name>, <IP_address>, and <port> with your network service name and proxy server's details).
- Disable the proxy server for HTTP and HTTPS (replace <service_name> with your network service name).
- View current proxy settings (replace <service_name> with your network service name).
Remember that these commands affect system-wide proxy settings on macOS, which may impact other applications that use the system proxy.
Ready to elevate your Microsoft Edge browsing experience even further? Don't miss our related articles on our sitemap that cover various topics and tips to enhance your online privacy and security. Also, try out Geonode's top-rated residential proxies for Microsoft Edge to enjoy a seamless, secure, unrestricted browsing experience. Experience Geonode residential proxies today!
