iPhones are known for their robust security features, but they are not impervious to online threats. Cybercriminals can breach your iPhone’s security and access sensitive data, especially when connected to unsecured Wi-Fi networks. Fortunately, installing a proxy server on your iPhone can protect you from these malicious parties and allow you to access blocked content from your region.
A proxy server is an intermediary between your device and the internet, making it harder for cybercriminals to track your online activities. Residential proxies are especially useful because they use IP addresses provided by internet service providers (ISPs), making them more difficult to detect and block than datacenter proxies.
Apple’s iOS allows you to configure different proxy settings for each Wi-Fi connection. Do note that you won't be able to access the internet if you make a mistake when configuring a proxy server. This is true for both iPhones and iPads.
Note: iOS won’t let you set up a SOCKS5 proxy server through the settings. This works only for HTTP(S) proxies.
This is the full tutorial on how to set up an iPhone proxy server.
Here are the steps you need to follow:
- Go to your iPhone’s wifi settings
- Locate the connected network’s proxy settings
- Choose an option you want to go with: automatically change proxy settings or manually enter them yourself
- Input the necessary information for either option
Setting Up Residential Proxies in IOS Devices
Step 1. Go to your Iphone’s Settings app.
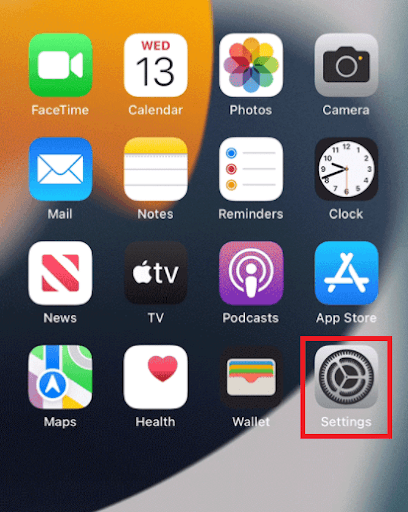
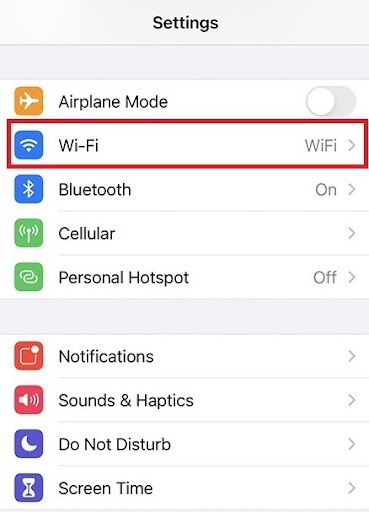
Step 2. Click on “Wifi”
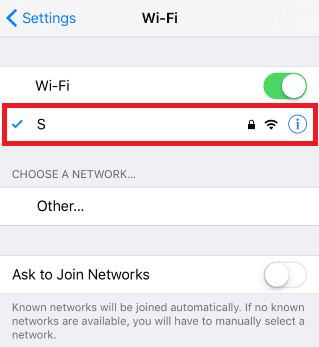
Step 3. Connect to the wi-fi network you want to use a proxy with and then tap on it again.
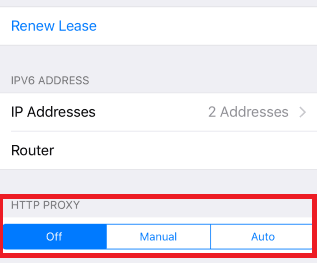
Step 4. Scroll down to the bottom and you will see the “HTTP Proxy” option
Configuring Your iPhone’s Proxy Settings
After being redirected to your iPhone’s proxy settings, you are then given two options to choose from: Manual proxy setup or automatic proxy setup. If you want automatic proxy detection for your proxy settings, choose the “Auto” option. Choose the “Manual” option if you want to utilize a specific ip address and port number.
If you choose the “Auto” option, your iPhone will then immediately check if a proxy is needed for your current network before automatically configuring your proxy settings. Your iPhone will not use a proxy server if it deems it to be unnecessary, but if you really want to use one then simply obtain an automatic proxy configuration script, or a .PAC file for short, and enter it in the url section as seen below.
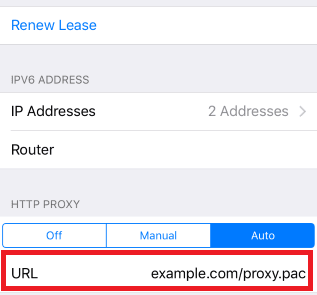
Note: You can get a .PAC file from your proxy service provider or your network administrator.
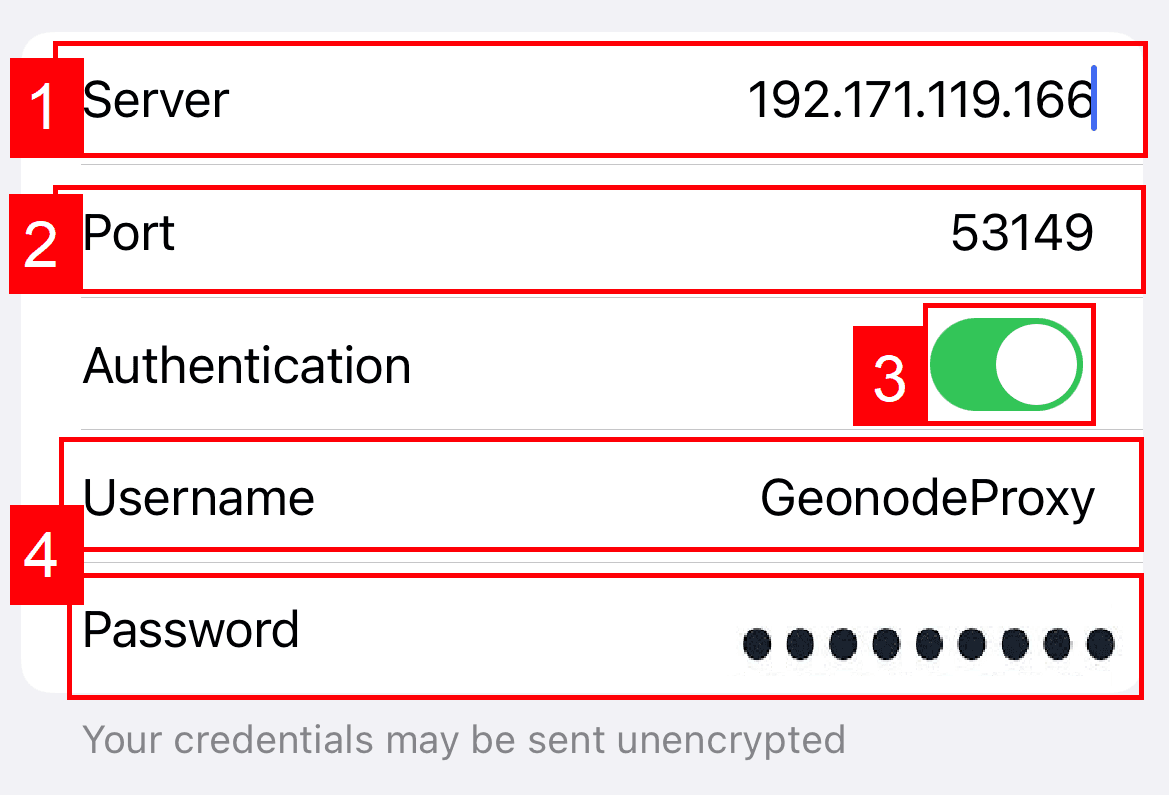
If you chose the “Manual” option then:
- Enter the server address or the IP address
- Enter the port number
- If your proxy provider says that authentication is required for the proxy server, then turn this on.
- Enter your authentication details
Here’s what they mean:
- Server Field: This is the IP address or domain name of the proxy server you want to use.
- Port Field: This is the port number that the proxy server uses to accept incoming connections.
- Authentication: This is an optional field that requires you to enter your username and password if your proxy provider requires authentication.
You have now set up a proxy server on your iPhone device. Check if the HTTP proxy is working correctly and hiding your IP address using a What Is My IP tool.
Note that an iPhone lets you configure separate proxy settings for different Wi-Fi connections, so you have to set up unique proxies for each individual connection. However, you can set up a global proxy server that works on all your connected networks but requires enterprise-grade configuration tools.
How to Turn off a Proxy Server on iPhone
If you want to turn off the proxy server on your iPhone, follow these steps:
- Go to your iPhone’s Settings app.
- Click on “Wi-Fi.”
- Connect to the Wi-Fi network you want to turn off the proxy for and tap on it again.
- Scroll down to the bottom to see the “HTTP Proxy” option.
- Toggle off the switch next to “HTTP Proxy.”
FAQs
Can I use a free proxy server on my iPhone?
While finding free proxy servers online is possible, we don't recommend using them for security reasons. Free proxies are often unreliable and can expose your data to malicious parties. It's better to invest in a reputable residential proxy provider to ensure your safety and privacy.
How can I check if my iPhone is using a proxy server?
You can check if your iPhone uses a proxy server by visiting a "What Is My IP" tool on your web browser. If the IP address shown on the tool is different from your regular IP address, then your iPhone is using a proxy server.
Can I use a proxy server with cellular data on my iPhone?
No. You can't use a proxy server with cellular data on your iPhone. Proxy servers can only be used with Wi-Fi connections on your device.
How do I know if my residential proxy provider is trustworthy?
It's essential to choose a reliable and trustworthy residential proxy provider to ensure the safety and security of your data. Look for providers with good reviews and a track record of providing quality services. You can also check if the provider offers features like 24/7 customer support, multiple proxy locations, and secure authentication.
How often should I rotate my residential proxies?
The frequency of rotating your residential proxies depends on your specific needs and use case. If you're using proxies for web scraping, you may need to rotate them frequently to avoid being detected and blocked. However, if you're using proxies for personal use, rotating them once a month or so may be sufficient.

