UC Browser is a mobile web browser that was developed by UCWeb and known for its number of features that help phones with limited memory and bandwidth. It’s the most popular mobile browser in India and Indonesia and the second most popular in China. UC Browser’s features include its small app size, low data usage, fast connection and download speed, and many more.
When using UC Browser to surf the internet, you may be at the risk of man-in-the-middle attacks and data leaks on your personal information. It’s important that you protect your online identity from people with malicious intent. To best protect yourself and your privacy, you need to use an browser proxy.
An UC Browser proxy will handle all of your web traffic for you so anytime you use the internet, websites you visit will only be able to see the IP address of the proxy server and your own IP address would be hidden. Hackers and people with malicious intent can’t track your location and personal data from your IP address anymore. An UC Browser proxy will also filter out malicious web traffic and protect you from cyber attacks.
The best UC Browser proxies would be residential proxies as these types of proxies use residential IPs from actual devices making you appear as if you were a genuine user instead of someone using a proxy. If you want a faster internet connection and you don’t mind sacrificing a bit of security and reliability, then you can also use datacenter proxies.
Let’s set up a UC Browser mobile proxy server.
How To Use Proxies With UC Browser
For Android:
Step 1. Go to your phone’s settings app.
 Image Alt Text: Android’s Settings App
Step 2. Tap on “Wifi”.
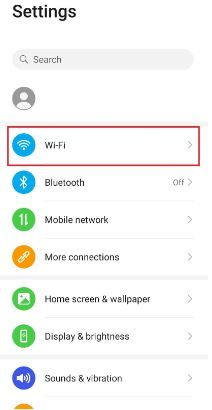 Image Alt Text: Android’s Wifi Settings
Step 3. Long-press the wi-fi network you want to use proxies with. Note: Make sure to connect to the wifi first.
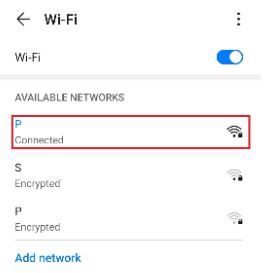 Image Alt Text: Going to Android’s Network Settings
Step 4. Tap on “Modify Network”.
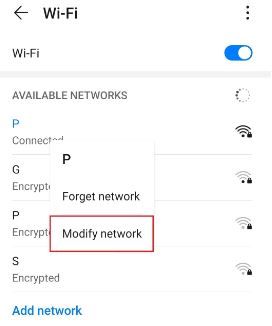 Image Alt Text: Android’s Network Settings
Step 5. Turn on “Show advanced options” and then click on “Proxy”.
 Image Alt Text: Going to Android’s Proxy Settings
This should then redirect you to your android device's proxy settings. Below is a detailed description of how to configure it.
Configuring Your Android Device’s Proxy Settings
After being redirected to your phone’s proxy settings, you are then given two options to choose from: Automatic proxy setup or Manual proxy setup.
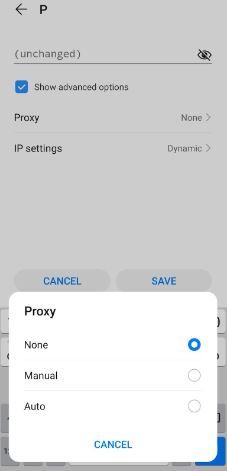 Image Alt Text: Android’s Proxy Settings
If you want your device to utilize specific proxy server settings, choose the first option “Manual”. Choose the second option, “Auto”, if you want your device to automatically detect your proxy settings.
Note: Older android versions may not have the “Auto” option available.
If you chose Manual configuration, then:
- Enter your proxy hostname Note: You can enter hostnames or ip addresses here
- Input your proxy port number
- Put any websites here that you don’t want to use any proxies on.
- Tap “Save” if you’re finished
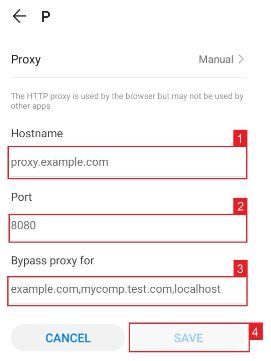 Image Alt Text: Android’s Manual Proxy Configuration
If you chose Auto configuration, simply:
- Enter your proxy service’s .PAC url.
- Tap “Save”
 Image Alt Text: Android’s Automatic Proxy Configuration
Note: Your service provider or network administrator will give you your required .PAC file.
Image Alt Text: Android’s Automatic Proxy Configuration
Note: Your service provider or network administrator will give you your required .PAC file.
For iPhone:
Step 1. Go to your Iphone’s Settings app.
 Image Alt Text: iPhone’s Setting App
Step 2. Click on “Wifi”
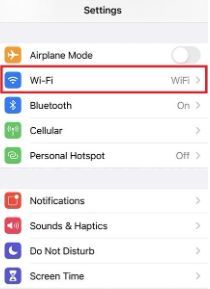 Image Alt Text: iPhone’s Wifi Settings
Step 3. Connect to the wi-fi network you want to use a proxy with and then tap on it again.
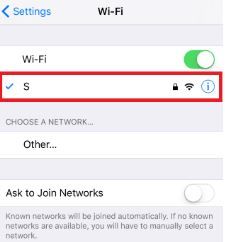 Image Alt Text: Going to iPhone’s Proxy Settings
Step 4. Scroll down to the bottom and you will see the “HTTP Proxy” option
 Image Alt Text: iPhone’s Proxy Settings
Configuring Your iPhone’s Proxy Settings
After being redirected to your iPhone’s proxy settings, you are then given two options to choose from: Manual proxy setup or automatic proxy setup. If you want automatic proxy detection for your proxy settings, choose the “Auto” option. Choose the “Manual” option if you want to utilize a specific ip address and port number.
If you choose the “Auto” option, your iPhone will then immediately check if a proxy is needed for your current network before automatically configuring your proxy settings. Your iPhone will not use a proxy server if it deems it to be unnecessary, but if you really want to use one then simply obtain an automatic proxy configuration script, or a .PAC file for short, and enter it in the url section as seen below.
 Image Alt Text: iPhone’s Automatic Proxy Configuration
_ Note: You can get a .PAC file from your proxy service provider or your network administrator._
If you chose the “Manual” option then:
- Enter the server address or an IP address
- Enter the port number
- If your proxy provider says that authentication is required for the proxy server, then turn this on
- Enter your authentication details
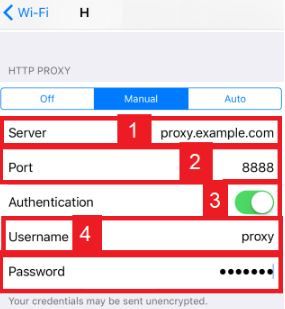 Image Alt Text: iPhone’s Manual Proxy Configuration
Congratulations! You have now finished configuring your mobile UC Browser proxy server.
