YouTube has become an indispensable part of our daily entertainment. Whether it be on a desktop or a phone, consuming video content on YouTube is part of many people's daily routine now. The fact that 5 billion YouTube videos are being watched daily speaks to the volume of what people are consuming every day. You would think that you would have unlimited access to all the videos but unfortunately, this isn’t true because YouTube will block your access to some videos.
When YouTube bans access to a video, it’s usually because of two things: either the poster blocked access to your country or YouTube itself blocked it due to local copyright issues. This annoys people especially if it happens to a video they are interested in watching. One of the best ways to go around this would be to install a proxy server on your system.
Enabling proxies while watching YouTube gives you a lot of benefits that are similar to VPN services. It allows you to unblock YouTube videos that are otherwise not available in your country. It allows you to increase views and watch time of YouTube videos multiple times since YouTube’s authentication only counts 1 view per single ip address and you can even automate the process using bots.
This tutorial is a thorough guide on how to use proxies while watching YouTube.
Here are the steps you need to follow:
- Go to your operating system’s proxy settings
- Choose an option you want to go with: automatically change proxy settings or manually enter them yourself
- Input the necessary information for either option
- Click “OK” to save!
Ensure that the browser you're using to watch YouTube is adopting your system’s proxy settings. Recommend using Google Chrome as it automatically uses your saved proxy settings.
Let’s set it up in your computer’s operating system.
Configuring Proxy Settings in Windows
To set up proxies in Windows, simply search for “Proxy Settings” in your windows search bar and open the search result.
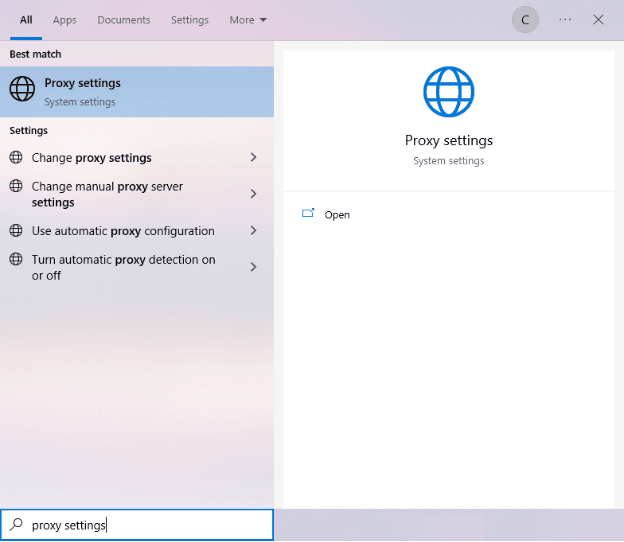
You are then given two options to choose from: Automatic proxy setup or Manual proxy setup. If you want windows to automatically detect your proxy settings, choose the first option. Choose the second option if you want to utilize a specific ip address and port number.
If you chose the first option, then:
- Turn on Automatically detect Settings
- Turn on Use setup script
- Enter the script address
- Click Save
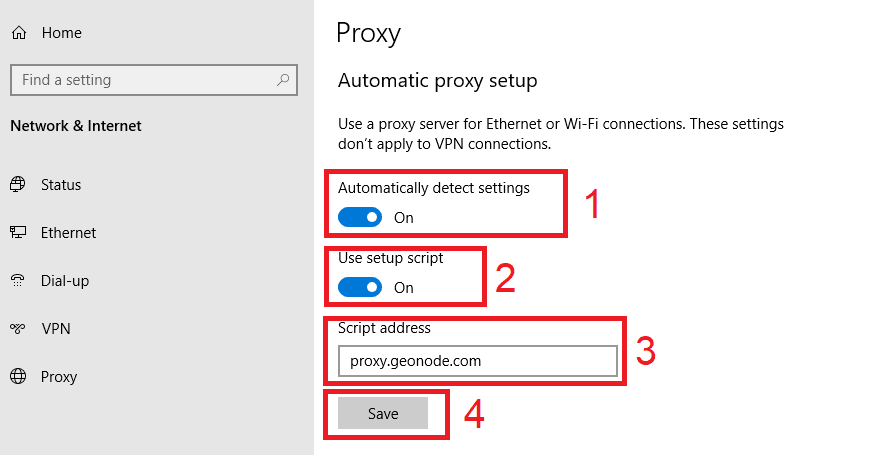
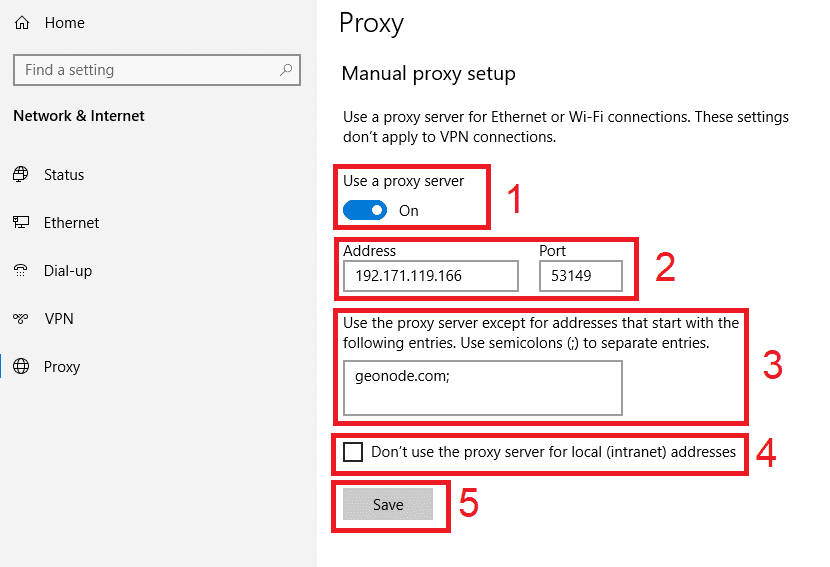
If you chose the second option, then:
- Turn on Use a proxy server
- Input both server address and port number
- If you have any addresses you would like to visit without a proxy, enter them here
- Turn on Don’t use the proxy server for local addresses check box if you want to access a local server without a proxy
- Click Save
Configuring Proxy Settings in MacOS
To start configuring your proxy settings in MacOS, simply:
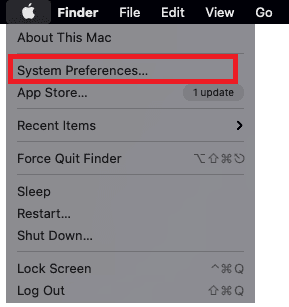
Step 1. Click on the Apple Icon.

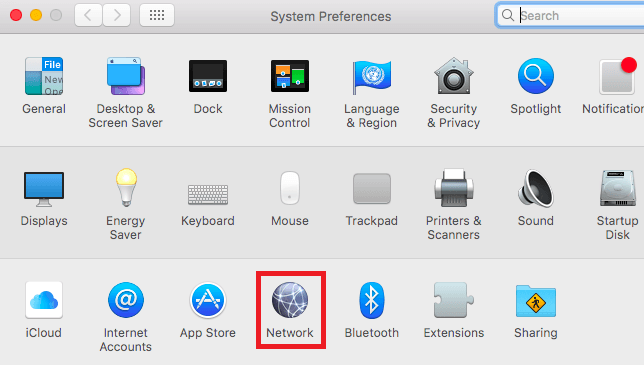
Step 2. On the drop down menu, click on “System Preferences”.
Step 3. Click on “Network”
Step 4. Click on “Advanced”
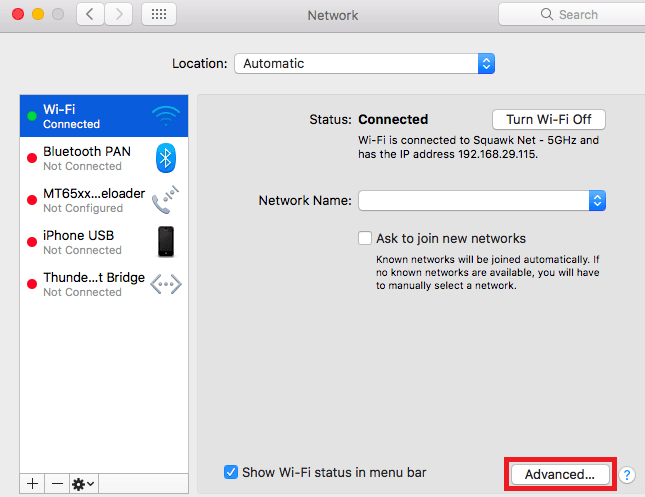 Note: Make sure to connect to your wi-fi first.
Step 5. Click on “Proxies”

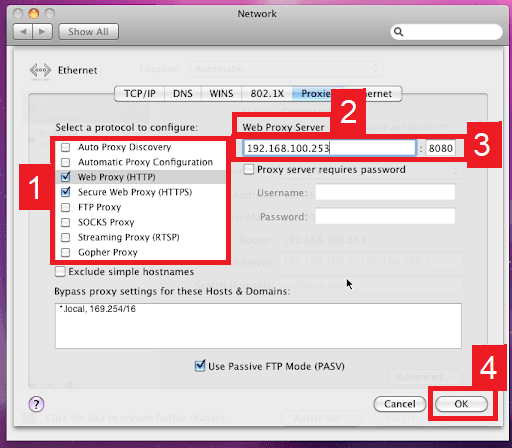
This should then redirect you to MacOS proxy settings. MacOS is more straightforward compared to windows. You only have one option which is to manually configure your proxy server.
Here are the steps to follow:
- Select which proxy IP protocol you want to configure. This depends on which protocols your proxy service provider offers.
- Turn on Secure Web Proxy
- Input the Proxy Server Address and Port Number
- Click OK to save the configurations
Note: You may be prompted for your Mac user password to save your settings.
Congratulations! You have now set up a proxy server for use when watching videos on YouTube. Remember to double-check if the browser you're using to watch YouTube is adopting your system’s proxy settings and the first time you visit YouTube, a prompt will appear asking for your login credentials from your proxy account.
Read more similar post... Sitemap


 Note: Make sure to connect to your wi-fi first.

