
Best for Brave
Residential proxies
from $0.27/GB
Sites see a home connection in the country you choose, and a sticky session keeps the same IP for up to 24 hours while you stay signed in.
Brave works on
Shields do not change your IP
Brave Shields block trackers, ads and fingerprinting scripts, but sites still see your real IP address. Only a proxy, Tor or a VPN changes it.
Where the proxy setting is
Brave has no proxy field of its own. Settings > System > Open your computer's proxy settings (brave://settings/system) opens the Windows or macOS proxy screen, which Brave follows.
Brave VPN is not a proxy
Brave VPN is a paid add-on that routes the whole device on Windows, macOS, Android and iOS (no Linux). It does not replace a proxy you choose by country.
Brave has no proxy form of its own, so pick a method by what it should cover: the whole computer, one Brave process or one Brave profile. Any method works with Geonode residential, ISP or datacenter proxies or the Geonode free list.
| Name | Works In | Auth | Blocking Resistance | Best For | Where To Get |
|---|---|---|---|---|---|
| System proxy (Windows, macOS or Linux settings) | Brave on all platforms, plus Chrome, Edge and other apps that follow the system proxy | HTTP/HTTPS: Sign in dialog | Shields still block trackers, so sites see only the proxy IP plus Brave's randomized fingerprint | One proxy for the browser and the rest of the device | Geonode proxy dashboard |
| --proxy-server command-line flag | Brave desktop on Windows, macOS and Linux, for that Brave process only | HTTP/HTTPS: Sign in dialog | A fresh --user-data-dir starts with no cookies, so sites don't link the proxy IP to your usual sessions | Brave on a proxy while other apps connect directly | Geonode proxy dashboard |
| Proxy extension (Geonode extension, FoxyProxy) | Brave desktop, per profile; installs from the Chrome Web Store | HTTP/HTTPS: stored in the extension | One click turns the proxy off for a site that blocks it. In private windows it works only after you turn on Allow in Private on its details page in brave://extensions | Switching proxies or countries from the toolbar | Geonode browser extension (free with a Geonode account) or FoxyProxy |
Brave accepts any proxy type. The sites you open decide which IPs get through without CAPTCHAs.
from $0.27/GB
Sites see a home connection in the country you choose, and a sticky session keeps the same IP for up to 24 hours while you stay signed in.
from $1.25/IP
The IP never changes, so shops and social sites that remember your sign-in location stop asking you to confirm it.
from $0.14/GB
Fast for reading public pages, but Google Search and sites with bot protection show more CAPTCHAs to datacenter ranges.
Free
Good for checking that Brave picks up the setting, but the operator of a free proxy can see your traffic, so never sign in to an account through one.
Copy the proxy host, port, username and password from your provider's dashboard before you start. A system proxy or --proxy-server also covers Brave private windows, but Private windows with Tor route through Tor instead, so check the IP there separately.
In Brave, click the three-line menu at the top right and choose Settings, or type brave://settings/system in the address bar.
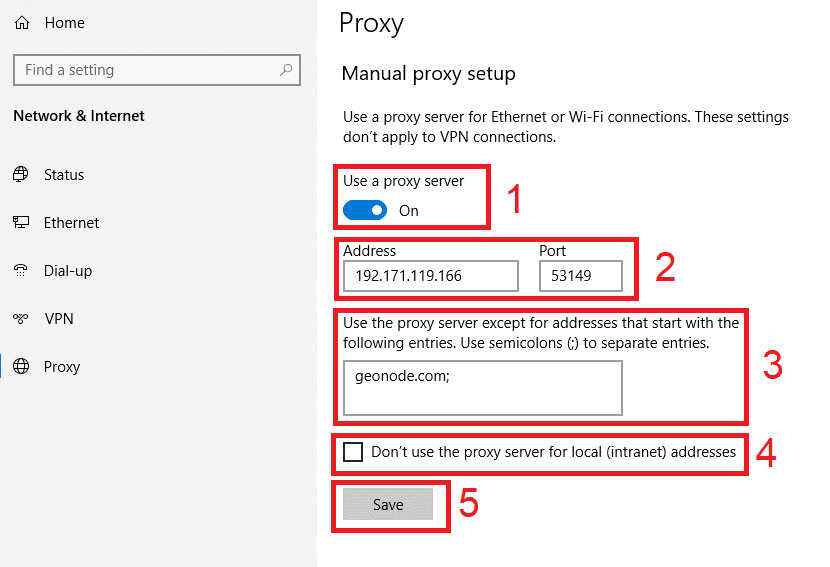
Click System in the left sidebar, then Open your computer's proxy settings. Windows opens Network & internet > Proxy.
Under Manual proxy setup, click Set up next to Use a proxy server. On Windows 10, the switch is on the page itself.
Turn on Use a proxy server.
Enter the host in Proxy IP address and the port in Port.
Click Save.
Open any site in Brave and enter the proxy username and password in the Sign in dialog.
Check detailed instructions on our blog:
Read the blog postOpen geonode.com/what-is-my-ip in Brave. It should show the proxy's IP and country, not yours.
If you used the flag or an extension, open the same page in another browser. Only Brave should show the proxy IP.
If the IP does not change, type brave://net-internals/#proxy in the address bar to see the proxy settings Brave actually applies.
Windows: open Network & internet > Proxy, click Set up next to Use a proxy server, turn it off and click Save.
macOS: in System Settings > Network, select the service, click Details > Proxies, turn off each proxy and click OK.
Flag or extension: quit Brave and start it from its normal shortcut, or turn the extension off in brave://extensions.