Established in 1995, Opera is known as a web browser that was built by an international team of exceptionally skilled people who dreamt to make the best online experience possible for its more than 350 million users worldwide. It comes pre-loaded with all sorts of features, including a built-in messenger of your choice to even a free VPN! Opera even has a browser built specifically for gamers called Opera GX and another for mobile devices called Opera Mini. Opera also has been at the forefront of keeping its users' privacy and security safe from any malicious parties.
Opera cares about your data and privacy to a very high extent, that they have built an ad blocker, a tracker blocker, a VPN, and even a crypto script blocker directly into their browser - so there is no need to install any extra extensions. As an Opera User, you have easy access to all of these features and the option to turn them on for free! Another great way to increase your security would be to install a browser proxy server especially if you frequently access a public wi-fi network.
A proxy server acts as an intermediary between yourself and any website you visit. So, instead of seeing you, the website only sees the proxy server. It’s quite easy to set up a proxy server through Opera, as it simply copies your operating system’s proxy settings much like Chrome. There’s also an Opera proxy server list that you can find and utilize proxies that Opera uses.
So let’s dive straight into it! This tutorial will show you how to change your Opera browser’s proxy settings.
Here are the steps you need to follow:
- Go to your operating system’s proxy settings through Opera
- Choose an option you want to go with: automatically change proxy settings or manually enter them yourself
- Input the necessary information for either option
- Click “OK” to save!
How to use Proxy on Opera
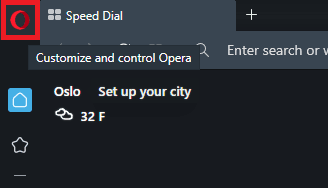
Step 1. Open the Opera browser and click on its icon located in the top left corner.
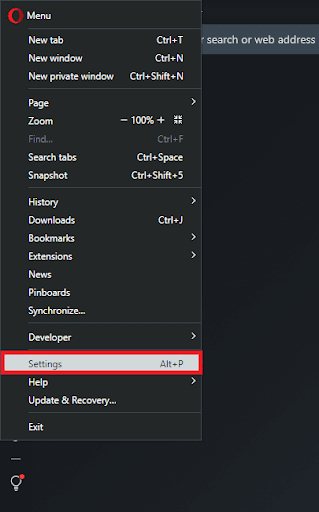
Step 2. On the Opera menu, click on Settings.
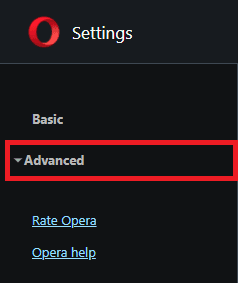
Step 3. Select Advanced.
Step 4. Then, click on Browser.
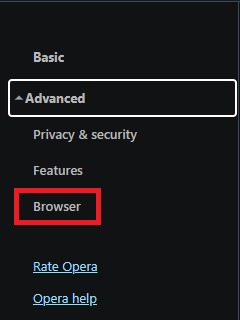
You will now be redirected to Opera’ settings window.
Step 5. Scroll down until you see System, and then select Open your computer’s proxy settings.
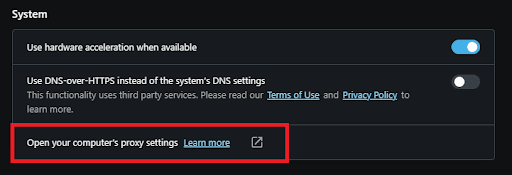
Alternatively, you can search for “Proxy” at the search bar located at the top right and then click on Open your computer’s proxy settings.

This should then redirect you to your system’s proxy settings. Below is a detailed description of how to configure it.
For Windows
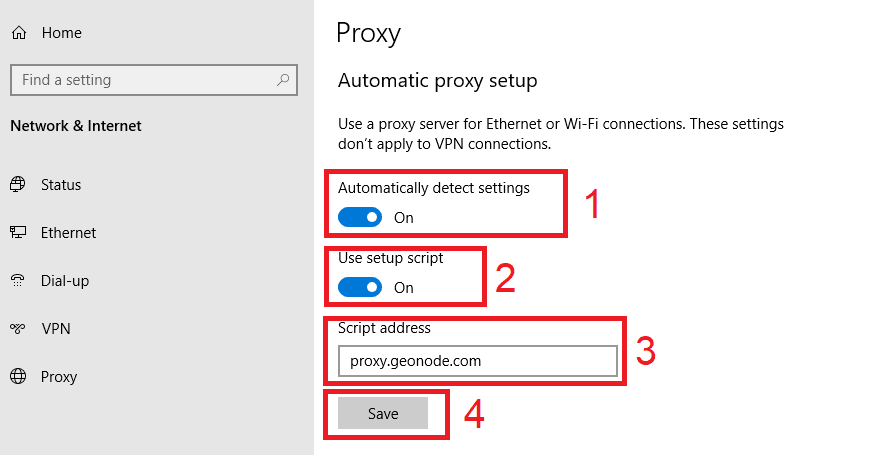
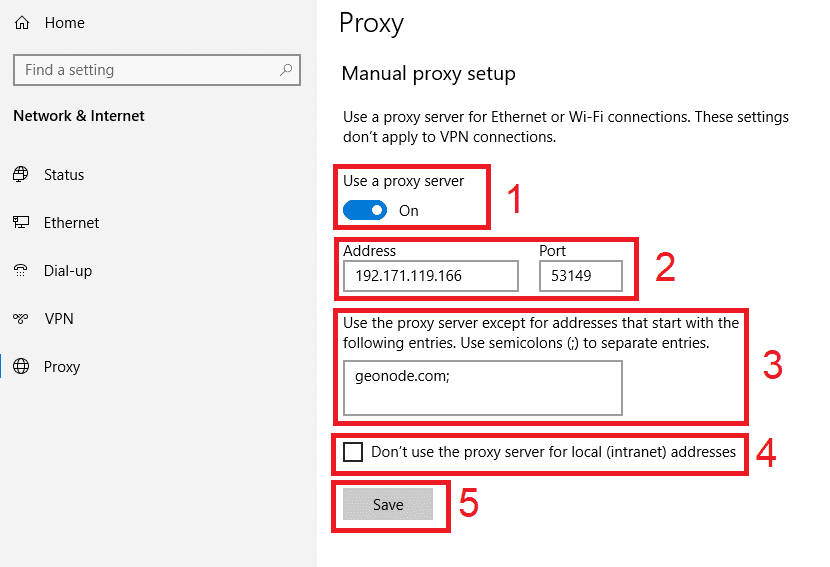
After being redirected, you are given two options to change your proxy configuration: an automatic proxy setup or a manual proxy setup. If you want automatic detection for your settings, choose the first option but if you want to utilize a specific ip address and port number then it’s better to manually configure it yourself.
If you chose the first option, then:
- Turn on Automatically detect Settings
- Turn on Use setup script
- Enter the script address
- Click Save
If you chose the second option, then:
- Turn on Use a proxy server
- Input both server address and port number
- If you have any addresses you would like to visit without a proxy, enter them here
- Turn on Don’t use the proxy server for local addresses check box if you want to access a local server without a proxy
- Click Save
For MacOS
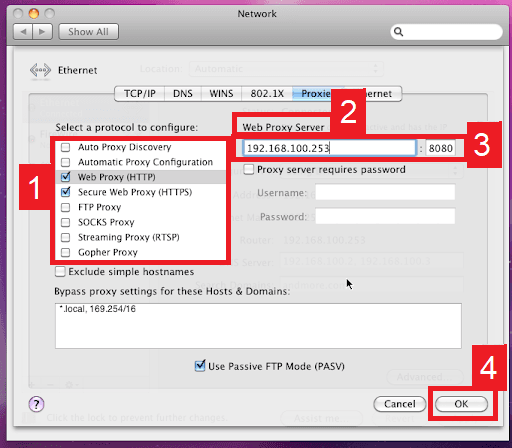
MacOS is more straightforward compared to windows. You only have one option which is to manually configure your proxy server.
Here are the steps to follow:
- Select which proxy IP protocol you want to configure. This depends on which protocols your proxy service provider offers.
- Turn on Secure Web Proxy
- Input the Proxy Server Address and Port Number
- Click OK to save the configurations
Note: You may be prompted for your Mac user password to save your settings.
Congratulations! You have now finished configuring Opera browser proxy settings. Do note that the first time you visit a website after setting up a proxy server, a prompt will pop-up asking for your login credentials from your proxy account.
Read more similar post... Sitemap


