Quickbooks is an accounting software package that allows you to manage all of your financial needs. It tracks your business’ expenses and income and is also used to pay for bills, prepare taxes, generate reports and many more. The Quickbooks software was developed by Intuit in 1983 and is available in Quickbooks Desktop or Quickbooks Online. Even if Quickbooks is mainly geared towards small and medium sized businesses, there are many plans and versions that would fit towards mostly everyone including freelancer or independent contractors.
A big limitation with Quickbooks is that it is only available in the US. If you’re not living in the US then you will not be able to access Quickbooks. EVen if you’re from the US and you travel to another country, then you still won’t be able to access Quickbooks. The best way to gain access to Quickbooks no matter where you are in the world is to use a Quickbook proxy.
A Quickbook proxy will act as an intermediary between your device and the internet. Any of your requests will be done via the proxy server so websites you visit will only be able to see the IP address of the proxy server and never your own. With geo-targeting, you can easily change your IP address to become a US IP and gain access to Quickbook. Residential proxies are the best proxies for this as websites will not be able to notice that you’re using a proxy.
Another function of a Quickbook proxy is when you want to have a faster connection. If you have a subpar connection speed, you can use a Quickbook proxy to have a faster internet connection speed. This is especially useful when you have to transfer huge amounts of data and have to do a lot of uploading and downloading files.
Let’s set up a Quickbook proxy server.
Note: If you’re using a web browser to access Quickbooks, make sure that it is set to automatically copy your computer’s proxy settings. Google Chrome automatically does this, so it’s recommended to use it.
For Windows:
To set up proxies in Windows, simply search for “Proxy Settings” in your windows search bar and open the search result.
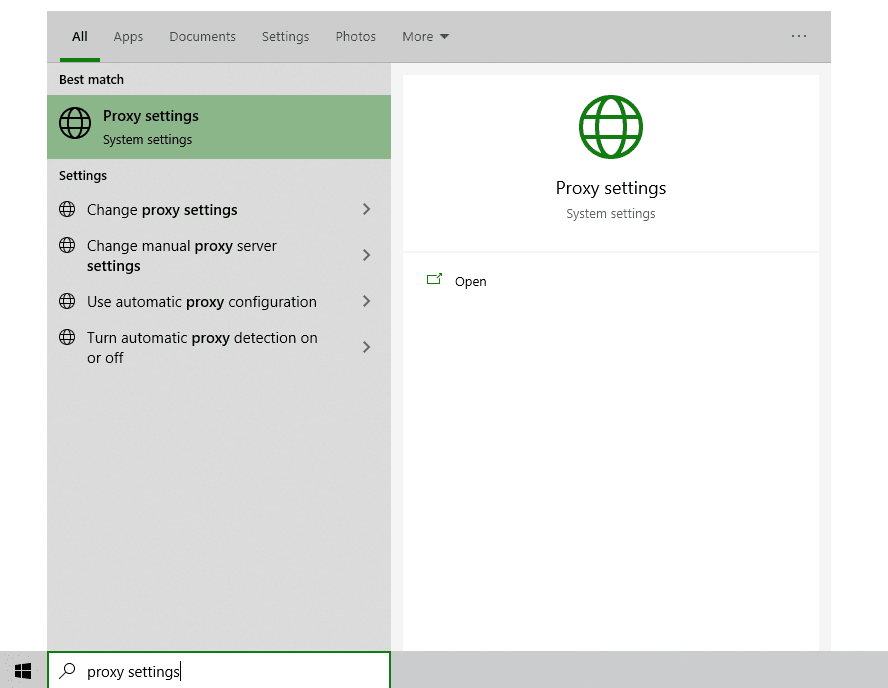
You are then given two options to choose from: Automatic proxy setup or Manual proxy setup. If you want windows to automatically detect your proxy settings, choose the first option. Choose the second option if you want to utilize a specific ip address and port number.
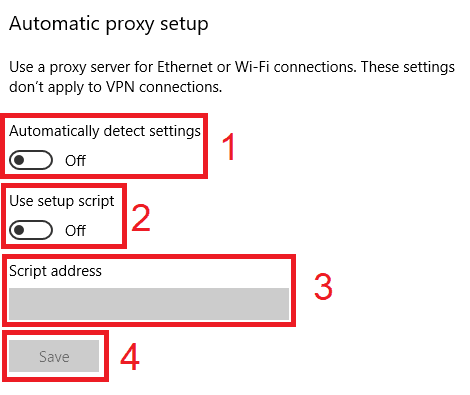
If you chose the first option, then:
- Turn on Automatically detect Settings
- Turn on Use setup script
- Enter the script address
- Click Save
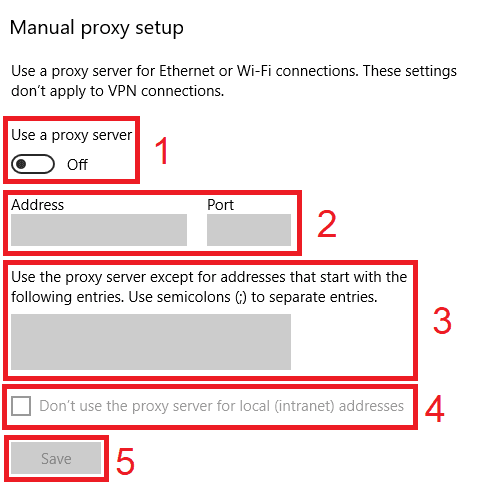
If you chose the second option, then:
- Turn on Use a proxy server
- Input both server address and port number
- If you have any addresses you would like to visit without a proxy, enter them here
- Turn on Don’t use the proxy server for local addresses check box if you want to access a local server without a proxy
- Click Save
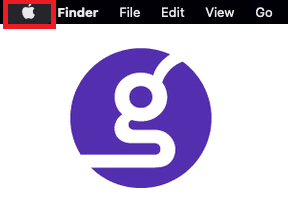
For Mac.
To start configuring your proxy settings in MacOS, simply:
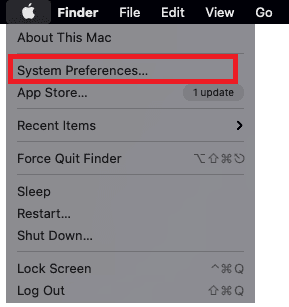
Step 1. Click on the Apple Icon.
Step 2. On the drop down menu, click on “System Preferences”.
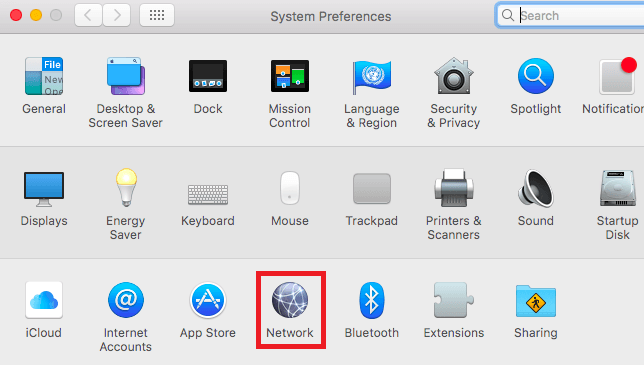
Step 3. Click on “Network”
Step 4. Click on “Advanced”
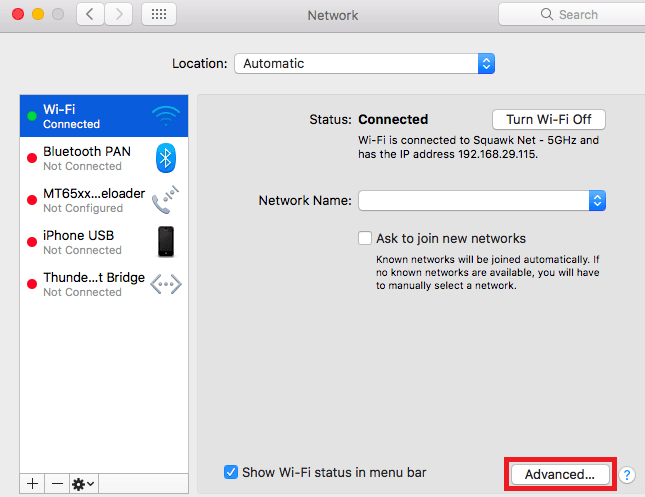
Note: Make sure to connect to your wi-fi first.
Step 5. Click on “Proxies”
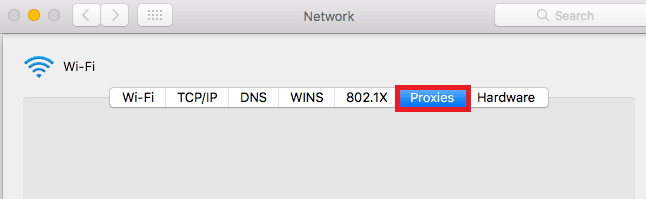
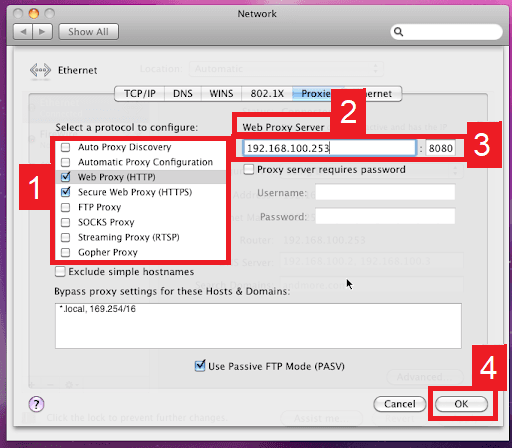
This should then redirect you to MacOS proxy settings. MacOS is more straightforward compared to windows. You only have one option which is to manually configure your proxy server.
Here are the steps to follow:
- Select which proxy IP protocol you want to configure. This depends on which protocols your proxy service provider offers.
- Turn on Secure Web Proxy
- Input the Proxy Server Address and Port Number
- Click OK to save the configurations
Note: You may be prompted for your Mac user password to save your settings.
For Mobile:
To set up a Quickbooks proxy server for your mobile device, simply change your phone’s proxy settings. The Quickbooks mobile app will automatically copy your phone’s proxy settings whenever you use it. Here’s a thorough guide for Android and another one for iPhone.
Congratulations! You have now finished configuring a Quickbooks proxy server. Note that the first time you visit it, there will be a pop up asking for your login credentials.
