Snapchat is an engaging multimedia messaging application that allows users to send images and videos to their friends and followers. However, the platform has limitations, such as restricting the number of accounts per device. A Snapchat proxy can help bypass these limitations while providing additional benefits, but it's essential to use proxies ethically and responsibly.
Understanding Proxies and Their Benefits
A proxy is an intermediary server between your device and the internet, masking your device's IP address and making it appear that your connection is coming from a different location. This offers several benefits for Snapchat users, such as:
- • Circumventing limitations on multiple accounts: By using a Snapchat proxy, you can create multiple accounts without raising suspicion or violating Snapchat's terms of service.
- • Accessing Snapchat from restricted countries: In certain countries, Snapchat is banned or blocked. A proxy can help you access the app by changing your virtual location.
- • Unblocking Snapchat on banned networks: If your network has been banned by Snapchat, a proxy can help you regain access by routing your connection through a different IP address.
However, there are risks and potential consequences associated with using proxies, so it's crucial to use them ethically and responsibly, especially when dealing with tasks like data scraping for research or competitive analysis purposes.
Choosing the Right Proxy Service
To ensure a seamless Snapchat experience, it's essential to find a reliable proxy server. There are various options available, including free proxy lists and paid services. Before committing to a paid option, consider testing free proxy servers to find one that suits your needs. Remember that paid services often provide better security, speed, and support.
Let’s configure a mobile Snapchat proxy server.
For Android:
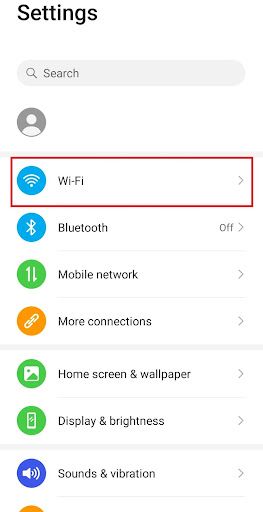
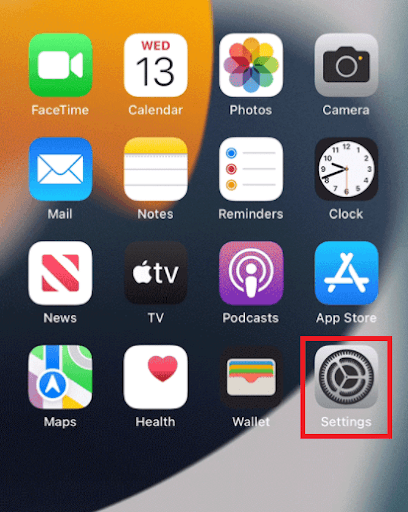
Step 1. Go to your phone’s settings app.

Step 2. Tap on “Wifi”.
Step 3. Long-press the wi-fi network you want to use proxies with.
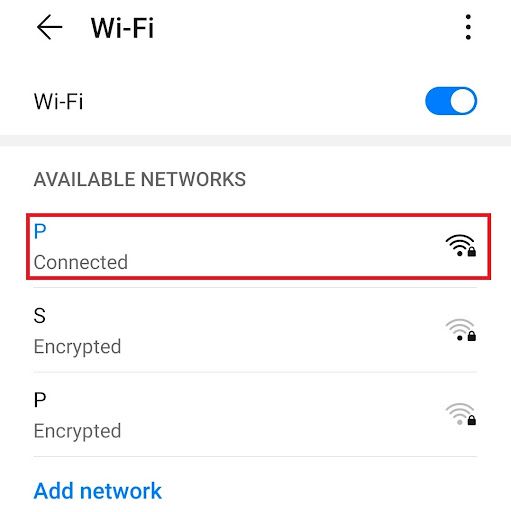
Note: Make sure to connect to the wifi first.
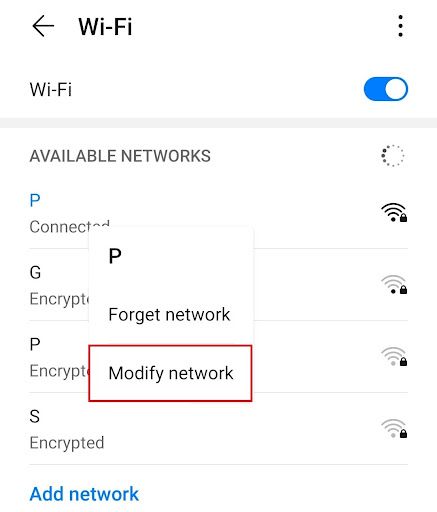
Step 4. Tap on “Modify Network”.
Step 5. Turn on “Show advanced options” and then click on “Proxy”.
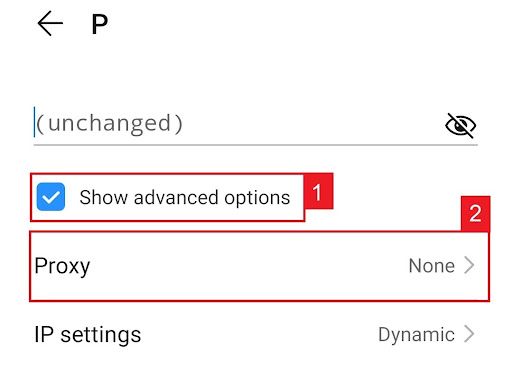
This should then redirect you to your android device's proxy settings. Below is a detailed description of how to configure it.
Configuring Your Android Device’s Proxy Settings
After being redirected to your phone’s proxy settings, you are then given two options to choose from: Automatic proxy setup or Manual proxy setup.
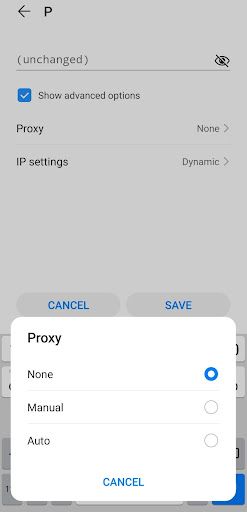
If you want your device to utilize specific proxy server settings, choose the first option “Manual”. Choose the second option, “Auto”, if you want your device to automatically detect your proxy settings.
Note: Older android versions may not have the “Auto” option available.
If you chose Manual configuration, then:
- Enter your proxy hostname
- Input your proxy port number
- Put any websites here that you don’t want to use any proxies on.
- Tap “Save” if you’re finished
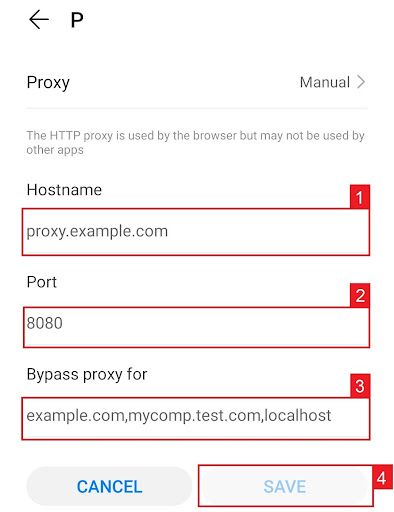
Note: You can enter hostnames or ip addresses here
If you chose Auto configuration, simply:
- Enter your proxy service’s .PAC url.
- Tap “Save”
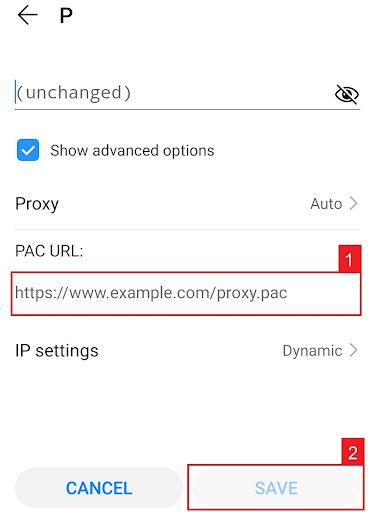
Note: Your service provider or network administrator will give you your required .PAC file.
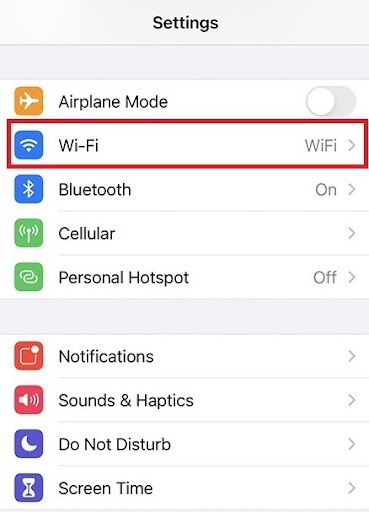
For iPhone:
Step 1. Go to your Iphone’s Settings app.
Step 2. Click on “Wifi”
Step 3. Connect to the wi-fi network you want to use a proxy with and then tap on it again.
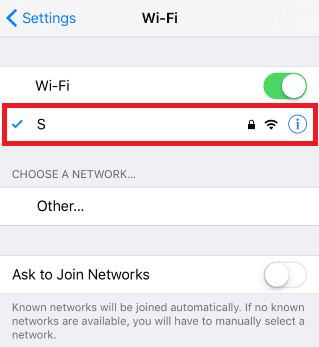
Step 4. Scroll down to the bottom and you will see the “HTTP Proxy” option
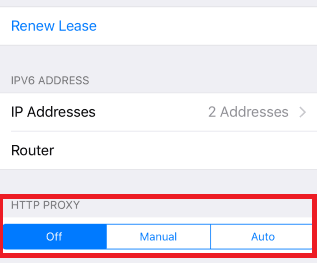
Configuring Your iPhone’s Proxy Settings
After being redirected to your iPhone’s proxy settings, you are then given two options to choose from: Manual proxy setup or automatic proxy setup. If you want automatic proxy detection for your proxy settings, choose the “Auto” option. Choose the “Manual” option if you want to utilize a specific ip address and port number.
If you choose the “Auto” option, your iPhone will then immediately check if a proxy is needed for your current network before automatically configuring your proxy settings. Your iPhone will not use a proxy server if it deems it to be unnecessary, but if you really want to use one then simply obtain an automatic proxy configuration script, or a .PAC file for short, and enter it in the url section as seen below.
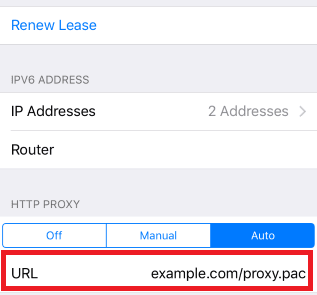
Note: You can get a .PAC file from your proxy service provider or your network administrator.
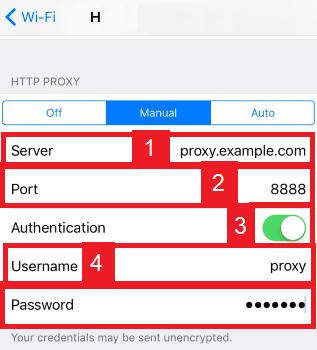
If you chose the “Manual” option then:
- Enter the server address or a IP address
- Enter the port number
- If your proxy provider says that authentication is required for the proxy server, then turn this on.
- Enter your authentication details
Congratulations! You have now finished configuring a Snapchat proxy server.
Best Practices for Using Proxies on Snapchat
When using a Snapchat proxy, follow these best practices:
- Rotating IP addresses: To avoid detection, use multiple IP addresses and rotate them regularly.
- Ensuring proxy speed and performance: Choose a proxy service that offers fast and reliable connections to ensure a smooth Snapchat experience.
- Staying within Snapchat's terms of service: Always adhere to Snapchat's guidelines and use proxies responsibly to avoid penalties or account bans.
Ready to take your Snapchat experience to the next level? Don't miss our other insightful posts on our sitemap covering a range of topics to help you maximize your social media presence. For the best results, try Geonode's residential proxies tailored for Snapchat. Elevate your game with Geonode and unlock the full potential of Snapchat today!
